Making your own wig is a fun and creative way to express yourself. Learn how to make wigs with these 25 amazing DIY wig tutorials, you’ll learn how to make different kinds of wigs for various occasions. Whether you want to make a yarn wig for your kids, a Rapunzel wig for yourself, or a Halloween wig from your own hair, we have you covered. You’ll find easy and clear instructions on how to weave, sew, and craft your own wigs with these DIY guides.
You’ll also discover a variety of wig making options, from curly yarn wigs to human hair wigs, and from lalaloopsy wigs to spiked wigs. You’ll get detailed and helpful tips on how to stitch, measure, and choose the right materials for your wig projects. No matter your skill level, you’ll be able to follow these wig-making guides and learn new tricks and techniques along the way.
You’ll also enjoy some unique and original DIY wig making ideas, such as a pixie wig or a yarn wig without a frontal. You’ll explore different ways to make a wig from scratch and customize it to your liking. You can change the size, color, and texture of your wigs to suit your personality and style. So, grab your tools and get ready to start your wig-making adventure today with these fun, informative, and creative tutorials on how to make wigs!

What is a Wig and Why You Might Want to Make One
A wig is a head covering that is made of natural or artificial hair. Wigs have been used for various purposes throughout history, such as for fashion, disguise, religious, theatrical, or medical reasons. Wigs can also be used to express your personality, creativity, or mood.
Making your own wig can be a fun and rewarding experience. You can customize your wig to suit your preferences, such as style, color, length, and texture.
You can also save money using simple materials you already have or can easily find. Making your own wig can also give you a sense of accomplishment and satisfaction.
How to Choose the Right Materials for Your Wig
The materials that you use for your wig will affect its appearance, durability, and comfort. There are various kinds of materials that you can choose from, such as:
- Human hair: This is the most natural and realistic option for your wig. Human hair wigs can be styled, colored, and treated like your own hair. However, human hair wigs are also the most expensive and require more maintenance than synthetic ones.
- Synthetic hair: This is a cheaper and easier alternative to human hair. Synthetic hair wigs come in a variety of colors, styles, and textures. They are also more resistant to heat and humidity than human hair wigs. However, synthetic hair wigs cannot be dyed or bleached, and they tend to lose their shape and shine over time.
- Animal hair: This is another option for natural hair wigs. Animal hair wigs are made from the fur or wool of animals such as horses, goats, sheep, or yaks. They are softer and lighter than human hair wigs, but they are also more prone to tangling and shedding. They also have a distinctive smell that some people may find unpleasant.
- Yarn: This is a creative and inexpensive option for your wig. Yarn wigs are made from knitting or crocheting yarn into strands of hair. They are easy to make and customize, and they can create a unique and whimsical look. However, yarn wigs are also less realistic and durable than other types of wigs.
When choosing the materials for your wig, you should consider the following factors:
- Your budget: How much are you willing to spend on your wig? The price of the materials will vary depending on their quality and quantity. You should also factor in the cost of other supplies and tools that you may need for making your wig.
- Your purpose: What are you going to use your wig for? The purpose of your wig will determine the style and quality that you need. For example, if you want a wig for everyday wear, you may want a more natural and comfortable material. If you want a wig for a costume or a special occasion, you may want a more colorful and dramatic material.
- Your preference: What kind of look do you want to achieve with your wig? The preference of your wig will depend on your personal taste and style. For example, if you want a more realistic and versatile look, you may prefer human hair or synthetic hair. If you want a more playful and creative look, you may prefer animal hair or yarn.
How to Measure Your Head and Prepare Your Wig Cap
The next step in making your wig is to measure your head and prepare your wig cap. A wig cap is the base of your wig that holds the hair in place. It also provides comfort and protection for your scalp.
To measure your head, you will need a measuring tape and a pen or marker. You should measure the following dimensions:
- Circumference: This is the distance around your head at the level of your hairline. You should wrap the measuring tape around your head from the front to the back, making sure it is snug but not tight.
- Front to back: This is the distance from the center of your forehead to the nape of your neck along the top of your head. You should place the measuring tape at the center of your forehead and run it over the crown of your head to the nape of your neck.
- Ear to ear: This is the distance from one ear to the other across the top of your head. You should place the measuring tape at one ear and run it over the top of your head to the other ear.
You should write down these measurements and compare them with the size chart of the wig cap that you want to use or make.
There are different types of wig caps that you can choose from, such as:
- Lace: This is a thin and breathable material that creates a natural-looking hairline. Lace wig caps are usually attached to the scalp with glue or tape.
- Mesh: This is a net-like material that provides more coverage and stability than lace. Mesh wig caps are usually sewn or clipped to the hair or the scalp.
- Elastic bands: These are stretchy and adjustable materials that fit snugly around the head. Elastic band wig caps are usually slipped on and off the head.
You can also make your own wig cap using materials such as stockings, tights, or fabric. You can cut and sew them to fit your head measurements and preferences.
How to Attach Hair to Your Wig Cap
The most important and challenging part of making your wig is attaching hair to your wig cap. There are various methods that you can use to attach hair to your wig cap, such as:
- Sewing: This is the most common and secure method of attaching hair to your wig cap. Sewing involves using a needle and thread to stitch hair wefts or bundles to the wig cap. You can use a sewing machine or do it by hand. You should start from the back of the wig cap and work your way up to the front, leaving some space for the hairline.
- Gluing: This is a faster and easier method of attaching hair to your wig cap. Gluing involves using a hot glue gun or a hair glue to stick hair wefts or bundles to the wig cap. You should apply a thin layer of glue to the wig cap and press the hair firmly onto it. You should also start from the back of the wig cap and work your way up to the front, leaving some space for the hairline.
- Knotting: This is a more intricate and delicate method of attaching hair to your wig cap. Knotting involves using a ventilating needle or a crochet hook to tie individual strands of hair to the wig cap. You should insert the needle or hook through the holes of the wig cap and pull the hair through, creating a knot. You should also start from the back of the wig cap and work your way up to the front, leaving some space for the hairline.
- Crocheting: This is a creative and fun method of attaching hair to your wig cap. Crocheting involves using a crochet hook and yarn to create strands of hair that resemble dreadlocks, braids, or twists. You should loop the yarn around the hook and pull it through the holes of the wig cap, creating a chain. You should also start from the back of the wig cap and work your way up to the front, leaving some space for the hairline.
When attaching hair to your wig cap, you should consider the following factors:
- The density: This is how thick or thin you want your wig to be. The density of your wig will depend on how much hair you use and how close you place them on the wig cap. You can use more or less hair, depending on your preference.
- The direction: This is how you want your hair to flow on your wig. The direction of your hair will depend on how you position them on the wig cap. You can create different effects by placing them horizontally, vertically, diagonally, or randomly.
- The length: This is how long or short you want your wig to be. The length of your wig will depend on how much you cut or trim your hair after attaching them to the wig cap. You can use scissors or razors to shape your wig according to your desired style.
How to Style and Care for Your Wig
The final step in making your wig is to style and care for it. Styling and caring for your wig will enhance its appearance, durability, and comfort.
To style your wig, you can use tools such as scissors, combs, brushes, curling irons, or flat irons. You can also use products such as hairspray, gel, wax, or mousse. You should style your wig according to your preference and occasion.
To care for your wig, you should follow these steps:
- Wash: You should wash your wig regularly with mild shampoo and conditioner. You should gently massage the shampoo into the hair and rinse it with lukewarm water. You should then apply a conditioner to moisturize and detangle the hair and rinse it again with lukewarm water.
- Dry: You should dry your wig carefully with a towel or a blow dryer. You should blot or squeeze out excess water from the hair and avoid rubbing or twisting it. You should then place it on a wig stand or a mannequin head and let it air dry completely.
- Store: You should store your wig properly when not in use. You should keep it away from direct sunlight, heat, dust, or moisture. You should also cover it with a net or a plastic bag and place it in a cool and dry place.
How to Avoid Common Mistakes and Problems When Making a Wig
Making a wig can be a rewarding but also challenging process. There are some common mistakes and problems that beginners might encounter when making a wig, such as:
- Uneven hair distribution: This is when some parts of your wig have more or less hair than others, creating an unbalanced or unnatural look. To avoid this, you should make sure that you use the same amount of hair for each section of your wig cap. You should also comb or brush your hair evenly and regularly to distribute it properly.
- Loose hair strands: This is when some of the hair strands fall out of your wig cap, creating a messy or thin look. To avoid this, you should make sure that you secure your hair well to your wig cap. You should also use quality materials and tools that do not damage or break your hair. You should also avoid pulling or tugging your hair too hard when styling or washing it.
- Visible seams: This is when the edges or lines of your wig cap show through your hair, creating an artificial or fake look. To avoid this, you should make sure that you cover your wig cap completely with your hair. You should also use a wig cap that matches your skin tone or hair color. You should also blend your hairline with your natural hair or makeup to create a seamless transition.
- Shedding: This is when your wig loses a lot of hair over time, creating a sparse or bald look. To avoid this, you should make sure that you care for your wig properly. You should wash, dry, store, and maintain your wig regularly and gently. You should also avoid exposing your wig to excessive heat, humidity, or friction.
How to Rock Your Wig with Confidence and Flair
The last but not least step in making your wig is to rock it with confidence and flair. Wearing a wig can be a fun and exciting way to express yourself and enhance your appearance.
To rock your wig, you should follow these tips:
- Accessorize: You can accessorize your wig with hats, scarves, clips, or jewelry to add some variety and spice to your look. You can also mix and match different accessories depending on your mood and occasion.
- Experiment: You can experiment with different styles and colors for your wig to create different looks and moods. You can also try different tools and products to style your wig differently. You can also switch between different wigs depending on your preference and purpose.
- Enjoy: You can enjoy wearing your wig and have fun with it. You can also share your wig with others and get feedback and compliments. You can also inspire others to make their own wigs and join the wig community.
I hope this guide has helped you learn how to make a wig from scratch.
25 DIY Wigs for Beginners
Do you want to change your hairstyle without cutting or coloring your natural hair? Want to try different looks and styles for fun or special occasions? Do you want to save money and time by making your own wigs at home? If you answered yes, discover 25 easy DIY wigs that you can make yourself with simple materials and tools.
These wigs are easy, affordable, and creative. They are also suitable for beginners who have little or no experience in wig making. You will learn how to make wigs from scratch, as well as how to customize and style them according to your preference.
Whether you want a wig that is natural, colorful, curly, straight, long, short, or anything in between, you will find something that suits your taste and personality. You will also discover some unique tips and tricks on how to care for your wigs and make them last longer.
So, what are you waiting for? Grab your scissors, glue, yarn, hair wefts, wig cap, and other supplies, and let’s get started. Here are 25 DIY wigs for beginners that you can make today.
1. DIY Yarn Wigs for Kids

This year, make a statement with your kid’s costume by making these DIY yarn wigs. Don’t worry if you’ve never made anything like this; anyone can do it!
You’ll only need one skein of yarn and an old pair of tights to get started. These two easy-to-find materials allow you to make the perfect wig for any costume or occasion. Start crafting today and let your little ones proudly wear their handmade creations! littledoveblog
2. Weave Your Own Wig – Step-by-Step Instructions

Make a unique, custom look with your hand-woven wig! This tutorial shows you how to make an affordable wig without expensive tools and materials.
You’ll need an acrylic yarn, weaving cap, thread, thin craft wire, hairspray, flat iron, foam head, or a similar round object for styling and support.
Follow step-by-step instructions to make the perfect one-of-a-kind woolen wig that won’t fall apart as store-bought ones. With this guide, you can make a beautiful new hairstyle in no time that will last for years! instructables
3. How to Make a Rapunzel Wig

Here is this Rapunzel wig that is a must-have for all fans of the beloved fairy tale! It’s remarkably easy to make with just two skeins of Caron brand yarn in lemon color and a cream stocking cap.
Your child can easily take it off and on themselves, which makes this the perfect hair accessory for days filled with dress-up play or special occasions. Get ready to make beautiful memories that will last a lifetime! sewlikemymom
4. Making Your Own Rapunzel Wig
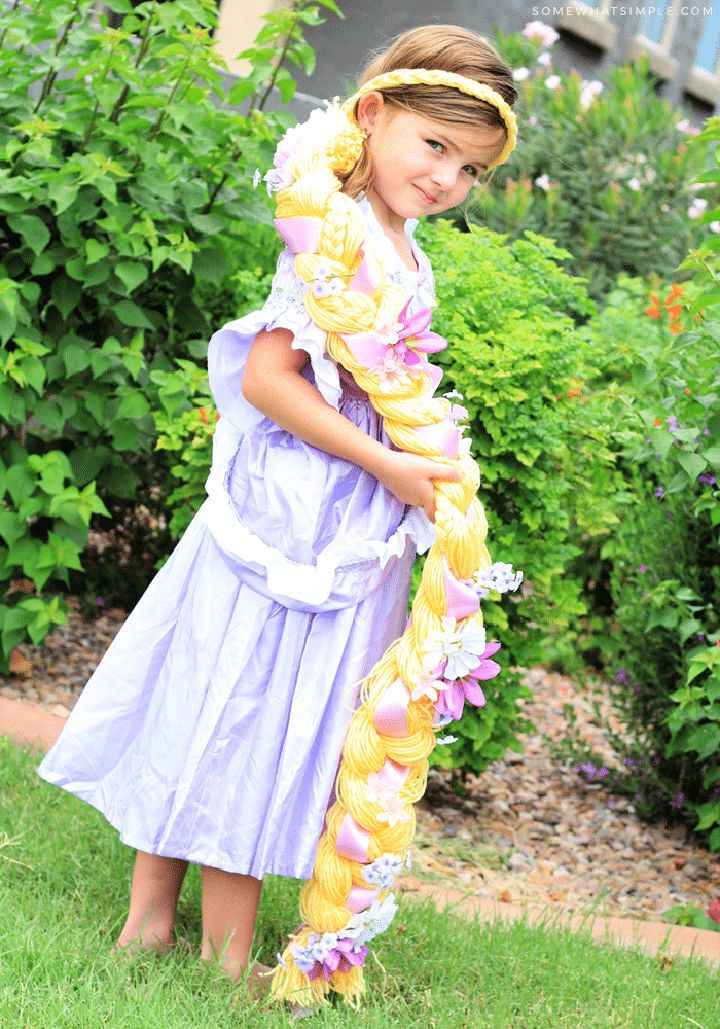
Transform your little princess into a tangled-loving rapunzel with this easy wig tutorial! You can craft the perfect costume or dress-up accessory in an hour or less.
Gather a big skein of yellow yarn, something to wrap around the same length as desired hair, rubber bands/hair ties, purple ribbon, silk flowers, and a hot glue gun & rhinestones for decoration.
Wrap the yarn around the object until it’s full, then tie it off with a rubber band. Secure onto the head with an elastic band & add ribbon & decorations. Perfect for halloween costumes or adding to any dress-up box! somewhatsimple
5. How to Make a Curly Yarn Wig
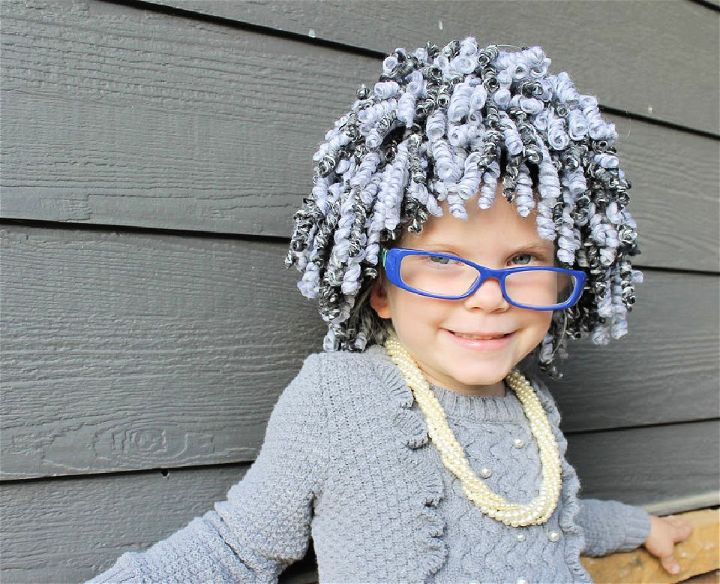
Make a magical and whimsical Halloween costume with a DIY curly yarn wig! Follow this step-by-step tutorial to make a stunning yarn wig for your Little Red Riding Hood or Granny costume. With just a few supplies like yarn, scissors, a hat, and embroidery floss, you can make beautiful curls that add the perfect touch to your costume.
Learn how to wind the yarn, apply starch, and bake it for long-lasting curls. Whether you opt for a salt-and-pepper or solid color, this wig will make your costume stand out. Get creative and make your Halloween extra special with this fun project! misskopykat
6. DIY Paper Wigs for Beginners

Let your imagination take flight; craft a hauntingly unique halloween look with paper wigs! Choose your favorite color or pattern newspaper, thin colored paper, or curling ribbon to make the hair.
Start by shaping a head form from a round object such as a cabbage and wrap it in masking tape for stability. Then use double-sided tape to secure the “hair” on top of the head form.
With just some plastic grocery bags, newspaper, masking tape, and a double-sided tap, you can make the perfect halloween accessory – paper wigs! Be creative and make fun costumes this year with these easy DIY paper wigs! marthastewart
7. How to Make a Braided Wig
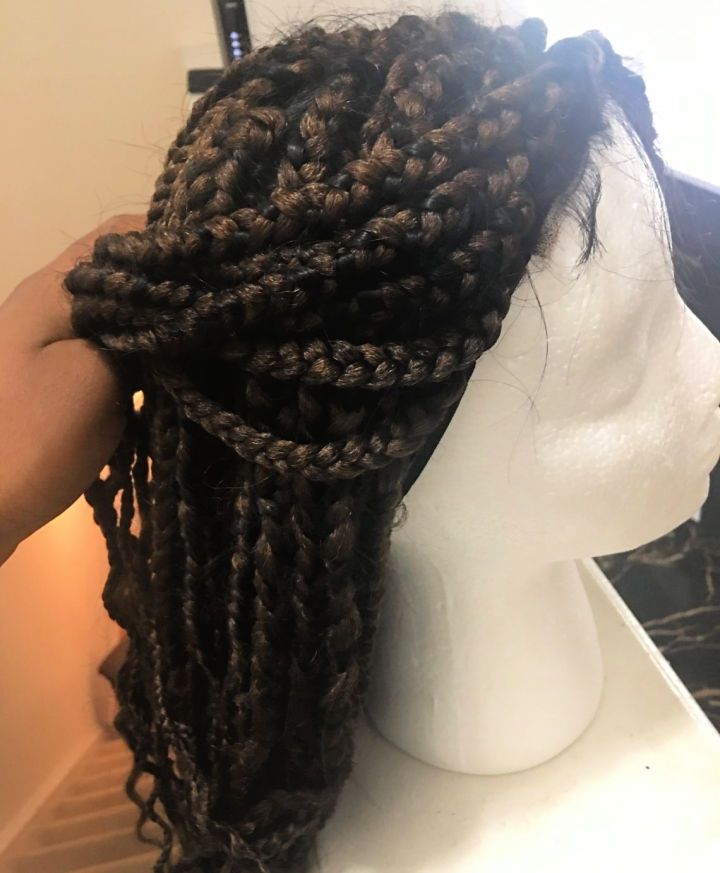
Learn how to make a beautifully braided wig with this easy guide! All you need is a mannequin head, your choice of braiding hair, a hair needle and black thread, a lace closure, a thick stocking cap, a comb, and something like a chair or string. Follow the instructions and make the perfect custom-made wig in no time.
Start by separating the braid into three equal parts, then weave them together using the same technique you would use for regular braids. Secure each section with the needle and thread through the base of your mannequin head.
Once done, cover it up with a thick stocking cap and secure it with pins if necessary. Finally, attach your lace closure on top for extra protection against shedding. Enjoy your new stylish look! faithnturtles
8. Making a Halloween Wig From Your Own Hair
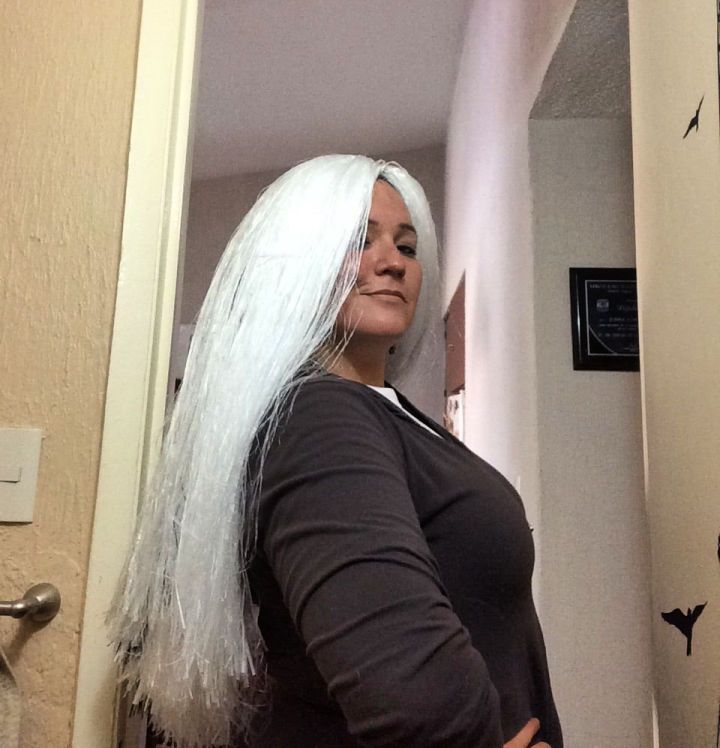
Need a wig for your DIY halloween costume but don’t want to spend too much money? Check out this affordable and easy way to make yourself a fantasy wig!
You only need some raffia ribbon, a fishnet stocking, an embroidery frame, and a pet’s wire brush. It may take time, but you will have an amazing-looking white and strawy witch or arctic-inspired look that’ll be perfect for the office costume contest – without breaking your budget! instructables
9. Handmade Lalaloopsy Wig
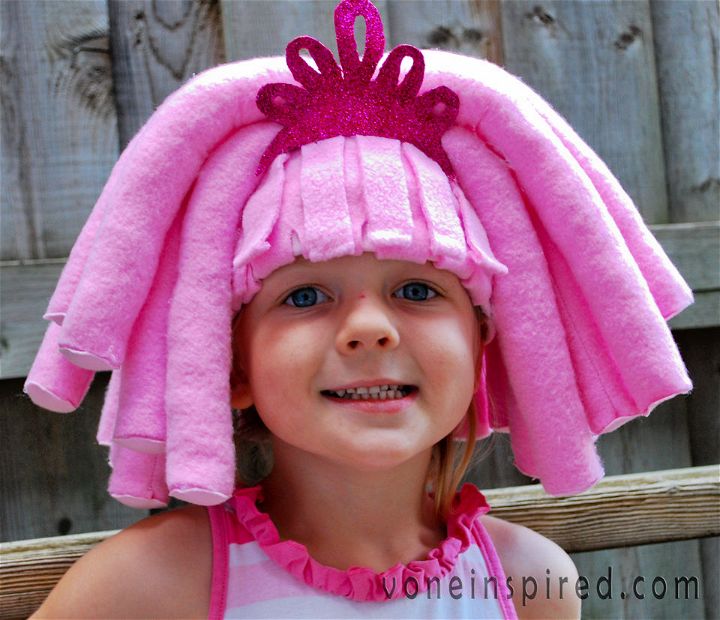
Dress your little one as a Lalaloopsy doll this Halloween with a DIY costume! Follow this step-by-step guide to make a Jewel Sparkles-inspired wig using knit fabric and polar fleece. Make the hair tubes, stuff them with batting, and attach them to a hat. Add bangs, layer the tubes, and trim them to achieve the desired look.
Complete the costume with a homemade tiara made from a cardboard base covered in glitter. Make sure to secure the wig with elastic for a snug fit. Get ready to bring Lalaloopsy magic to life with this adorable costume! voneinspired
10. DIY Wool Yarn Wig Tutorial

Design the perfect wool wig with this wool yarn wig tutorial! This tutorial is great for any character you or your kid may want to make, whether a rag doll wig, a Jessie wig, or a Sally wig.
To start your project, gather 1-2 skeins of 7 oz. Of wool yarn, stretch fabric for the cap, and ⅝ inch width elastic (or ½ inch). Don’t forget to have a curved needle and thread handy too!
With these materials and this easy-to-follow guide, you can craft an amazing wool yarn wig to bring your custom creation to life. Try it out today! erikaparradesigner
11. Yarn Wig for Rainbow Brite
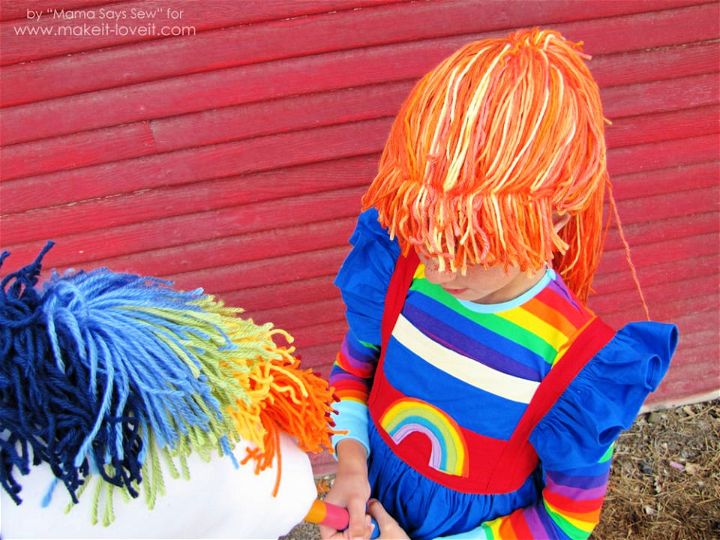
Bring rainbow brite to life with a DIY yarn wig! This tutorial will show you how to make the perfect yarn wig for your costume. Use ombre yarn for a more natural look, but you can use any type of yarn in any color.
It’s easy and quick to make – just find something on hand and start stitching it together! You can even play around with the hairstyle by changing where you sew – this determines where the part is in your “hair.” With some imagination and creativity, you’ll have that perfect rainbow brite look in no time! makeit loveit
12. Make Your Own Wig
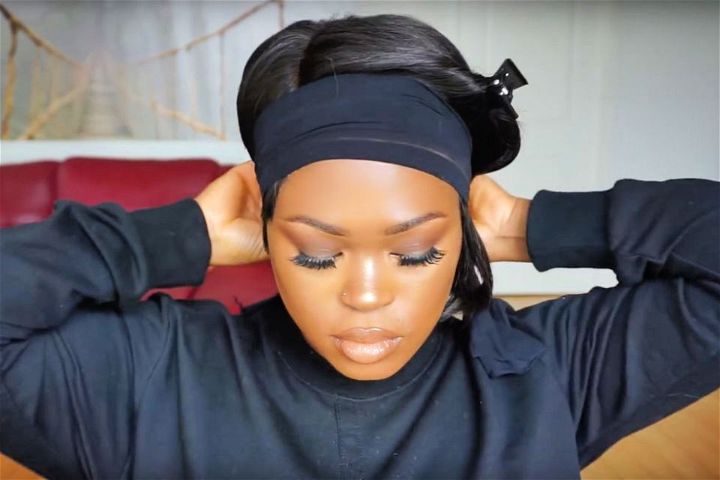
Discover the easy and affordable way to make your wig with this DIY step-by-step guide! Even if you’re new to wig making, you can have a beautiful result that looks amazing.
This project covers everything from perfect fitting to find a color match for your hair – all without spending a fortune on pre-made wigs. Make the stunning look you want today with this simple tutorial – stop wasting time and start creating! elle
13. Simple DIY George Washington Wig
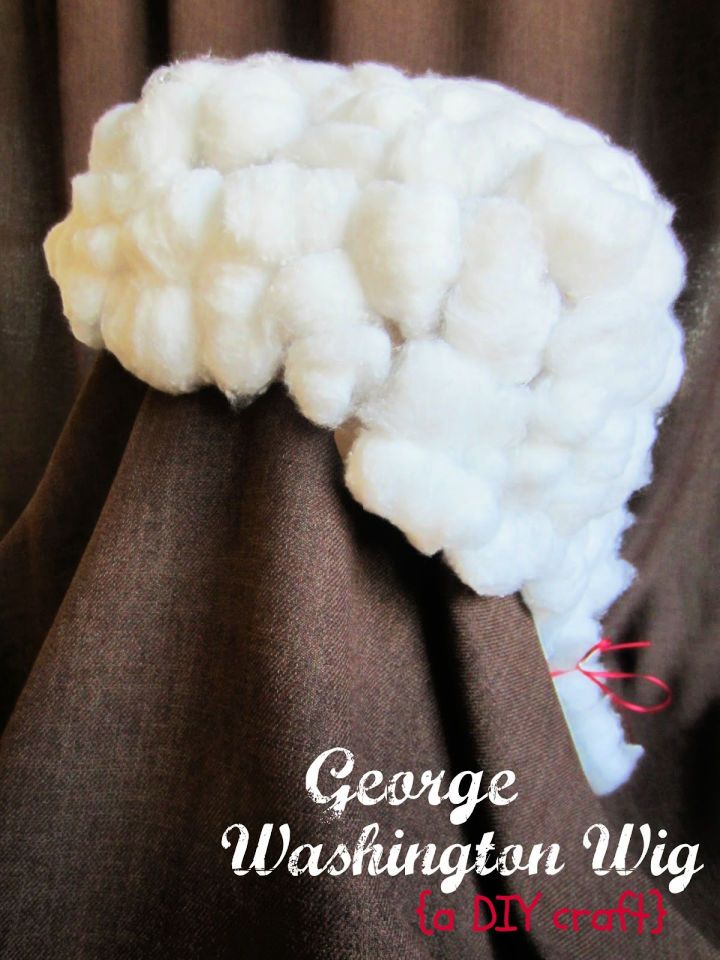
Replicate George Washington’s iconic hairstyle with this DIY! You’ll need a paper grocery bag, cotton balls (lots of them!), a low-temp glue gun and glue sticks, and ribbon to make your own.
With these supplies, you can make the perfect wig for celebrating Washington’s birthday on February 22nd. Make an impressive costume piece, or just have fun making one of history’s most recognizable wigs in the comfort of your home! deceptivelye
14. How to Do Curly Yarn Wig
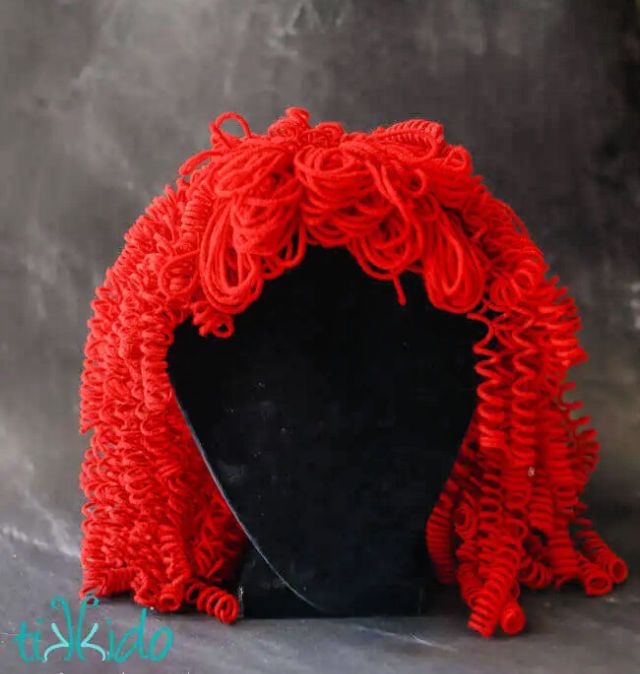
Make your kid the star of the show with this easy-to-follow curly yarn wig tutorial for a raggedy Ann costume! The hybrid between an Irish dancing wig and a classic raggedy Ann look creates bouncy curls that make your little one look adorable on stage.
This technique also creates Merida wigs, la loopsy wigs, or rainbow unicorn manes. You only need yarn, large straws, liquid starch, a wig-weaving cap, and heavy-duty button thread. Follow this tutorial to give your child the perfect costume accessory they won’t wait to show off! tikkido
15. Making a Spiked Wig
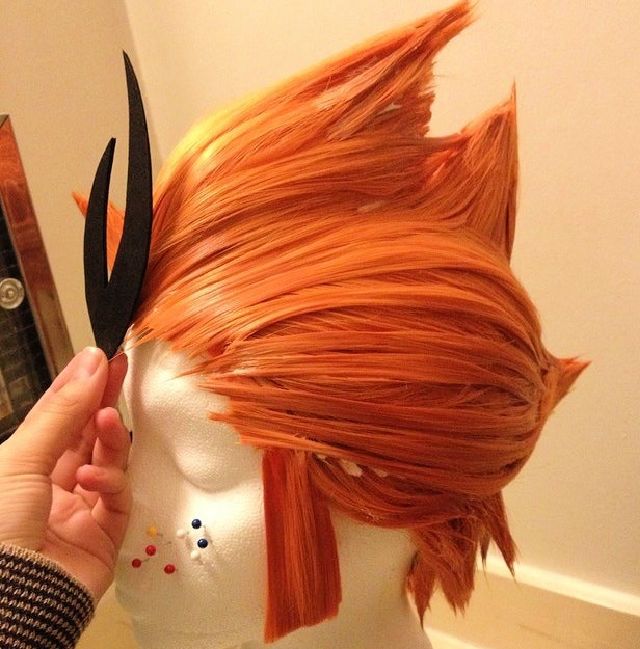
Are you having trouble styling a wig with impossible spikes? No worries! This spiked wig tutorial will help you make the perfect spiked look.
Prepare your required items: wig, wig head, pins, hot glue gun, writing utensil, fabric, craft foam, hair spray, clips, and wax.
Follow along the simple steps to get the best results- use pins to secure the base of your wig onto the mannequin head; draw the desired pattern on craft foam and layer it over the swiped area; apply tacky glue onto the base of the wig & lay down fabric for texture; brush & blow dry until spikes stand up even then finish off with hairspray and wax. With this tutorial in hand -you’ll be sure to master this spiky style quickly! instructables
16. DIY Cats Wig at Home
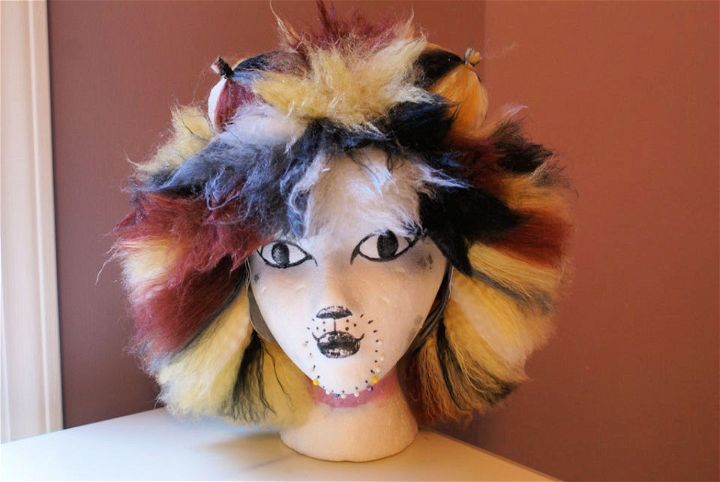
Learn how to make a Cats-style wig with this step-by-step DIY guide. Perfect for Halloween or costume parties, these wigs are a creative and fun addition to your feline ensemble.
With materials like Lions Brand Homespun Yarn, control top pantyhose, fabric for sideburns, and a hot glue gun, you can easily make your own cat wig. The instructions cover prepping the yarn, making the wig base, building the ears and sideburns, styling the bangs, and more. Get ready to transform into a purrfect cat with this easy and exciting DIY project. instructables
17. How to Sew Human Hair Wigs
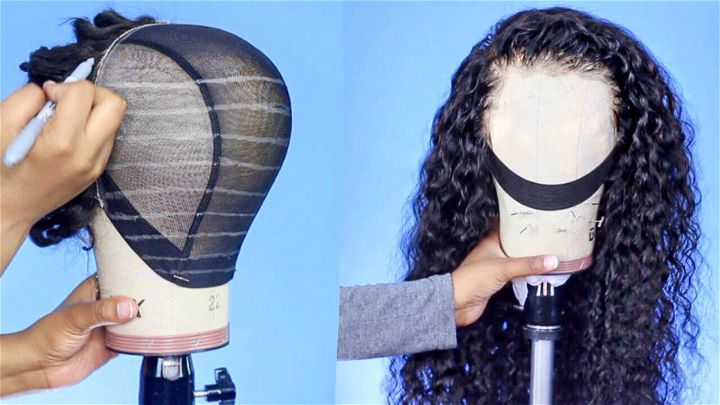
To make your wig, look no further than this step-by-step tutorial! Learn how to make a professional-looking wig with the sewing machine and hand-sewn methods.
With this helpful guide, even beginners can make their own high-quality wigs quickly. Follow along step by step, and soon you will be ready to show off your fabulous new do! Get started now on making your custom wig today.
18. Easy DIY Lace Frontal Wig
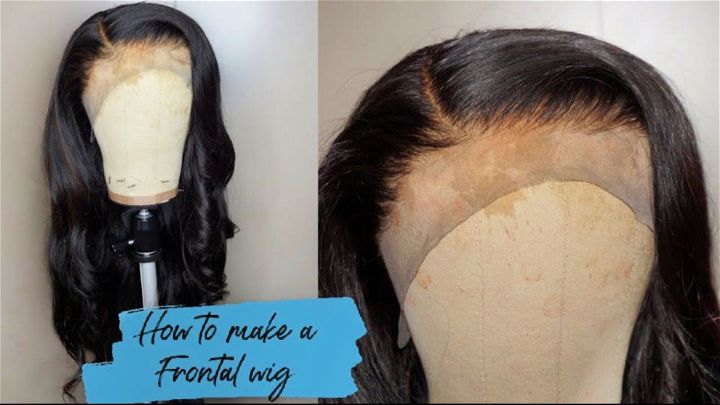
Assemble your lace frontal wig quickly and easily with this detailed video tutorial! Perfect for beginners, this step-by-step guide will walk you through the entire process, from choosing the materials to customizing and styling.
You’ll be amazed at how easy it is to make a stunningly beautiful wig in no time.
Whether you’re looking for a special event style or something more subtle for everyday wear, make it yourself with this simple DIY lace frontal wig tutorial – perfect results are guaranteed!
19. DIY Lace Frontal Wig
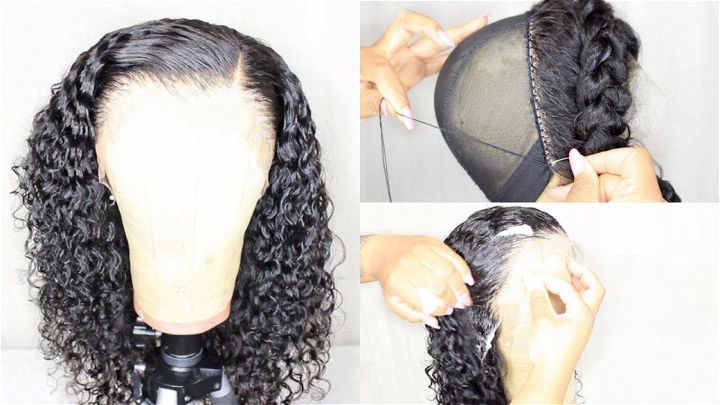
Design your custom wig with a lace frontal! This step-by-step guide will show you exactly how to do it. All you need is a wig stand, canvas mannequin head, t-pins, duck clips, mesh dome cap, needle and thread combo, co-wash conditioner, oil for protection, and setting lotion for styling.
Using the pins and clips, you need to attach the mesh dome cap on the mannequin head. Then secure it with some needle and thread.
Wash your hair with a co-wash conditioner before attaching it to the lace frontal to moisturize it properly. Add oil as a protective layer, then style in small sections, setting lotion for added hold. Finally, finish by wrapping small strips around each section of hair for longevity, or use gel/hairspray if desired! With this detailed guide making a customized lace front wig has never been easier!
20. Make a Blunt Bob Wig From Your Own Hair
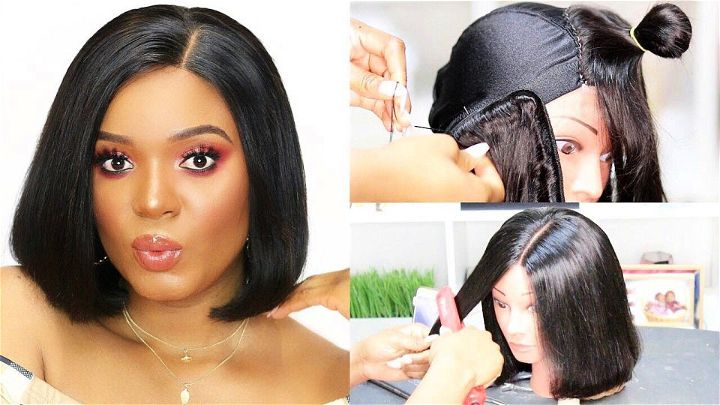
Searching to make a blunt bob wig of your own? Look no further! This easy-to-follow video guide will show you exactly how to make a stunningly beautiful blunt bob in no time.
Even if you’re a total newbie, this DIY tutorial is simple enough for anyone to follow, and with just a few materials, you’ll be amazed at the finished product. Don’t wait any longer – try this DIY blunt bob wig from start to finish today!
21. DIY Closure Wig Using Glue
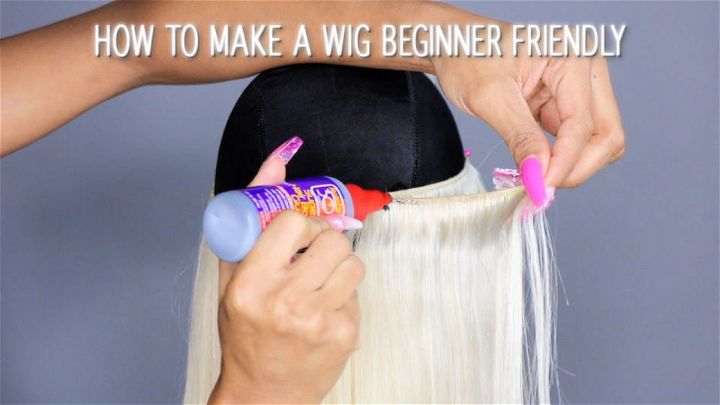
Learn how to make a wig with glue for beginners! In this video, you will get an easy-to-follow guide on making your gorgeous closure wig using Brazilian straight #613 blonde bundles.
You only need 2 bundles and lengths of 14″, plus take advantage of the 10″ closure. With this tutorial, you can make a beautiful wig to grab compliments everywhere you go! Get started now and join the ranks of those who have mastered their DIY skills with this helpful video.
22. Homemade Wig for Girls
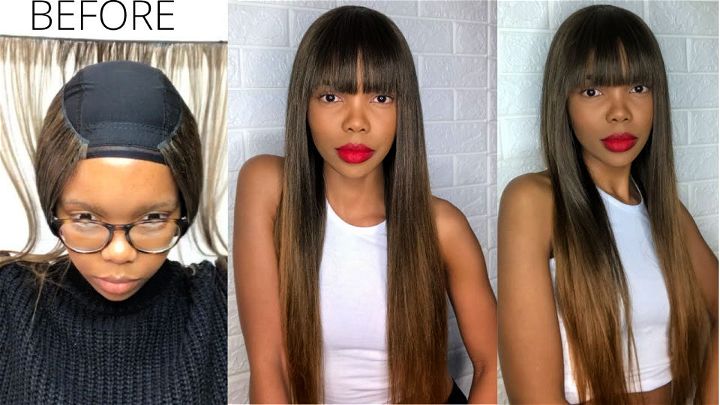
Say goodbye to your wig woes and jump into a world of easy and affordable solutions! Learn how to make your custom wig with only r218 / $12.91.
You will need bonding glue, a dome cap, 2 wig caps, rainbow hair bundles, and a straightener to make this look. With these items, anyone can now make their own customized wig without breaking the bank. Get creative and start making wigs today!
23. How to Make Pixie Wig
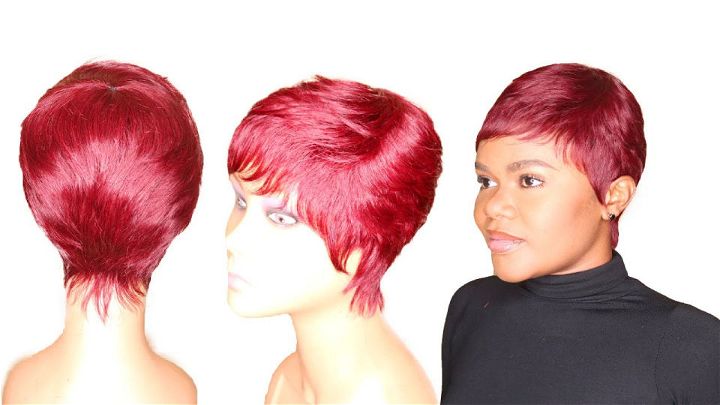
Craft a beautiful pixie wig in no time with this beginner-friendly DIY guide! You don’t need to splurge or break the bank to make your unique pixie wig.
All you need are a few easy-to-find materials, and you’ll have a stunning accessory perfect for any special event or everyday wear!
Follow this step-by-step tutorial and learn how to craft your custom pixie wig that will turn heads wherever you go. Get started now and see why DIY is always the way to go when styling your hair.
24. DIY Wig Without a Fronta
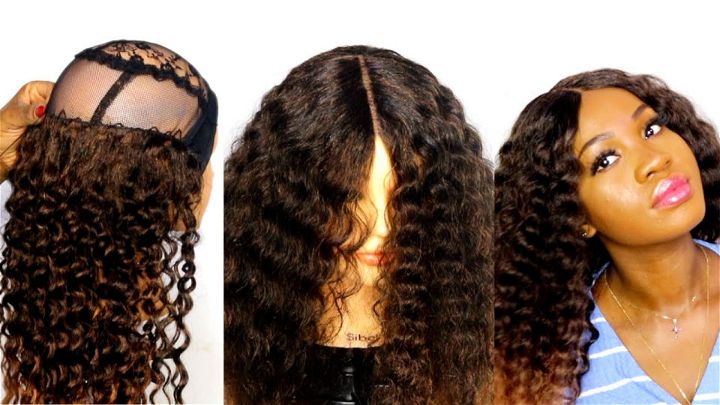
Wondering how to make a wig without a frontal? You can craft a unique look quickly with noble gold premium synthetic hair, an Eveline contour stick, and a wig cap!
Start by using nail clippers to cut the hair weft down. Then use your hot glue gun and stick to secure the back of the cap onto the wig line. Next, brush out tangles with weave brushes and combs before styling them as desired.
Finally, spritz on some olive oil nourishing sheen spray for added shine! Give yourself an amazing new style with this easy-to-follow guide today!
25. How to Make a Yarn Wig
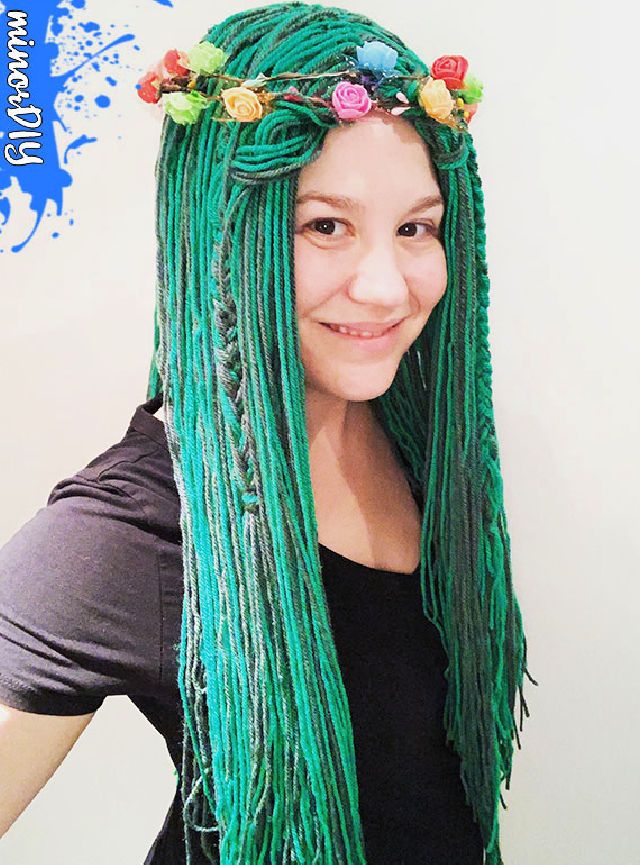
Make a unique and stylish wig without sewing with this easy tutorial on making a yarn wig! You can easily craft your custom-made wig with just two to three balls of yarn, a loosely knit hat, and a crochet hook or any similar tool.
Perfect for costumes and cosplay, these no-sew wigs are affordable options that will make you look great in no time. Get creative and let your imagination run free with this simple DIY project that lets you make an amazing new look today! minordiy
Conclusion:
Making your own wig is not only a rewarding and creative hobby, but also a great way to save money and customize your look. You can choose from different types of hair, colors, textures, and styles to make a wig that suits your personality and mood. Whether you want to make a wig for everyday use, for cosplay, or for special occasions, you can find 25 easy DIY wigs making tutorials and guides above to help you along the way.
You can learn how to make a wig using a sewing machine or by hand, using a lace cap or a hair net, and using wefts of hair or bundles with closure or frontal. Also, you can experiment with different techniques and materials to achieve different effects, such as curly, straight, or wavy hair. You can also make wigs from your own hair or from synthetic hair, depending on your preference and budget.
So, don’t hesitate to start your wig making journey today with these amazing ideas on how to make wigs!

